Subscribe to Updates

    Get the latest creative news from FooBar about art, design and business.

    What's Hot

    Best Billing and Invoicing Apps for Android Users

    January 17, 2023

    Why my headphone jack is not working – How to Fix

    December 17, 2022

    How to create & edit videos even if you are not a video-editor

    December 15, 2022
    Facebook Twitter Instagram
    Facebook Twitter Instagram Pinterest YouTube
    Digital Dopes
    Subscribe Login
    • Home
    • Blog
    • Windows 11
    • How-to Articles
    • Hardware
      • Laptop
      • Raspberry Pi
      • Motherboard
      • Smart Device
      • Mouse
      • RAM
      • Printer
    • Apps
    • Contact Us
    Digital Dopes
    Raspberry Pi 4 Heatsink Placement & Installation Guide
    Raspberry Pi

    Raspberry Pi 4 Heatsink Placement & Installation Guide

    Nilesh RanjanBy Nilesh RanjanDecember 15, 2020No Comments3 Mins Read
    Facebook Twitter Pinterest LinkedIn Tumblr WhatsApp Email Reddit
    Share
    Facebook Twitter LinkedIn Pinterest WhatsApp Reddit Email

    Placing heatsinks in Raspberry Pi 4 help solve the heating problem and can enable you to run bigger tasks for longer time. Here you will learn about how to install Raspberry Pi 4 Heatsink.

    Raspberry-Pi-4-Heatsink-Placement-Installation-Guide

    Contents hide
    1 Raspberry Pi-4 Heatsink Locations
    2 How to Install Raspberry Pi 4 Heatsink
    2.1 Conclusion

    In comparison to the previous model and the latest model of the raspberry pi, the set of heatsinks was just advisable and not necessary with the previous models. however, the situation has been changed with the latest raspberry pi 4 B model. here you will find that the CPU gets too hot under ideal and normal load conditions which are quite irrelevant and prone to the working environment of your raspberry pi. As you see in the raspberry pi case, the board is mounted in the closed closure, similarly, if the CPU is, then the CPU starts to choke consequently results in the lowering of the performance. So placing heatsinks on the CPU is considered to dissipate the heat. But if you are considering a closed case there is a very little or negligible chance for the heat to dissipate. Besides placing heatsinks, we also advise you to use a well-ventilated case.

    You will need a kit that encompasses the aluminum heatsinks for the raspberry pi 4 B. For CPU [14 x 14 x 6 mm], for USB [9 x 9 x 5 mm] and [9 x 9 x 9mm] for Ethernet controller, all with 3M conductivity thermal adhesive.

    Important : If you do not have an official Raspberry Pi 4 charger, you Pi can overheat even it can give raspberry pi 4 low voltage warning signal. So it’s very important to use an original Raspberry Pi 4 charger.

    Raspberry Pi-4 Heatsink Locations

    When we inspect the components which are getting a heat, we get to the following conclusion
    1. The processor –a processor without heatsinks or any case easily reaches to the temperature about 60 degrees running at ideal which i9s a matter of concern for you. The temperature of the CPU increases to more than 80 degrees if it consists of a board in a closed case and a CPU loaded at 25%.
    2. The USB – You will see a rise in the temperature of the USB depending on the type and the no. of USB devices connected to it.
    3. The Ethernet controller – There is an increment in the temperature of the Ethernet controller to as your processor and the USB .so it becomes really important to place heatsinks.
    Pic showing the placement of heat sinks areas.

    How to Install Raspberry Pi 4 Heatsink

    To Install Raspberry Pi4 Heatsink you need to keep your Pi and heatsink on the table and follow these steps:-

    1. Match the size of the heatsink but just putting it above the heatsink placement locations and see weather it fits perfectly, if yes then move on to step no 2.

    How to Install Raspberry Pi 4 Heatsink

    2. Remove the Plastic from the heatsink.

    Remove the Plastic from the heatsink

    3. Place The Heatsink on the Pi and do not try to move it soon let it stick.

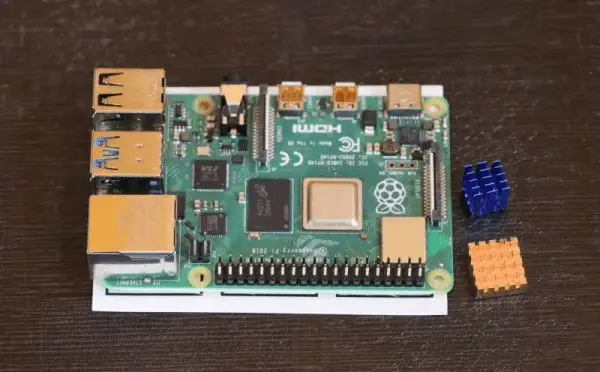
    However in this model from PiBOX India only two heatsink is provided and here is how I have installed them.

    raspberry pi 4 heatsink install

    Conclusion

    After installing heatsink on my Raspberry Pi, the temperature of the Pi decreased and it can run longer without getting overheated however if you want to run heavy tasks on the Pi you should consider installing a fan on the Pi.

    raspberry pi 3 heatsink installation raspberry pi 4 heatsink Raspberry Pi 4 Heatsink Placement raspberry pi heat sink
    Share. Facebook Twitter Pinterest LinkedIn Tumblr WhatsApp Email
    Previous ArticleHow to connect Raspberry Pi to Laptop Display
    Next Article How to fix Blue Screen faulty hardware corrupted page in Windows 10
    Nilesh Ranjan
    • Website

    Related Posts

    How to connect Raspberry Pi to Laptop Display

    August 3, 2020

    How to Solve Raspberry Pi under voltage detected problem

    April 25, 2020

    Leave A Reply Cancel Reply

    Our Picks
    • Facebook
    • Twitter
    • Pinterest
    • Instagram
    • YouTube
    • Vimeo
    Don't Miss
    Apps

    Best Billing and Invoicing Apps for Android Users

    By Nilesh RanjanJanuary 17, 20230

    Best Billing and Invoicing Apps for Android Users Businesses these days need modern invoicing solutions…

    Why my headphone jack is not working – How to Fix

    December 17, 2022

    How to create & edit videos even if you are not a video-editor

    December 15, 2022

    Is Windows Security secure enough nowadays?

    October 13, 2022

    Subscribe to Updates

    Get the latest creative news from SmartMag about art & design.

    About Us
    Our Picks
    New Comments
    • whatpeopleask on How to Set up and Add Dropbox to File Explorer in Windows 11
    • Rahul Kumar Singh on How to Set up and Add Dropbox to File Explorer in Windows 11
    • Auslandsumzug on How to Set up and Add Dropbox to File Explorer in Windows 11
    • Nilesh R Roy on How to Install Windows 11 from USB on a HP Laptop
    © Copyright Digital Dopes 2023
    • Home
    • Blog
    • Terms and Conditions
    • About Us
    • Privacy Policy
    • Sitemap
    • Contact Us

    Type above and press Enter to search. Press Esc to cancel.

    Go to mobile version

    Sign In or Register

    Welcome Back!

    Login to your account below.

    Lost password?