Windows 11 is a quick and responsive operating system. However, if you have multiple apps that you want to open when you log in, it can slow down the boot process. The boot process will be impacted by many apps that you have installed.
We will now learn to disable startup apps in Windows 11 and speed up the boot process.
How to Disable Startup Apps on Windows 11
- Press Windows key + I to open Settings.
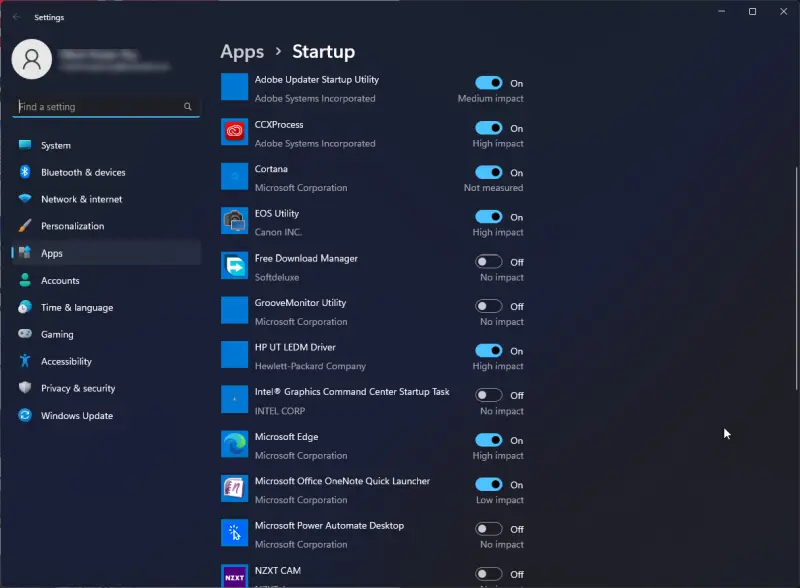
- Next, go to Apps, then click on Startup from the right panel.

- After that, all the apps set to startup during boot will be listed. Turn off the app you don’t want to run.

- You will be able to see each app’s impact on startup. For example, here, Microsoft OneDrive has a high impact. This will help you to determine which apps are allowed to run during startup.
- You can also order apps by name, status, and startup impact.

Disable Startup Apps using Task Manager
- Right-click on Start button and select Task Manager.

- Next, go to Startup tab. To stop the app from running, right-click on the app and select Disable.

- Windows 11 Task Manager offers more options to determine if you want an app removed from startup. You can sort by name, status, startup impact, or publisher, just like in Settings. You can also add additional columns by right-clicking on a column header. Here, for example, I attached the “CPU at Startup” column.

- You might end up installing so many programs that you don’t remember what they are for. Task Manager makes it easy to view the file location and properties of an app. If that fails, you can also search online for the app. Just right-click an app to access the information you require.

- After setting up the computer, I will turn off all other programs. It is essential to check if the app has been added to your startup. If it isn’t necessary, you can deactivate it. This is also a good place for you to start if your computer isn’t starting as fast as it used. Check the list and uninstall any apps that are not necessary, especially those that have a high startup impact.
- I get asked if any apps need to be disabled. The answer is NO Windows will still usually start if you disable them all. Some things that you need will not be available at all. These items will need to be manually activated.
- Although it’s not an actual science, you can still experiment with which apps delay the startup process by logging in.
How to Stop Windows 11 Apps from Running in the Background
Windows 11 have Microsoft’s built-in apps, and downloaded apps from the Microsoft Store run in the background by default. This is beneficial if you want to keep up-to-date and receive notifications from apps such as Twitter or Mail. The apps can also update in the background.
There are some disadvantages to apps running in the background. Suppose you’re on a laptop or other Windows 11 device like a Microsoft Surface. In that case, you might want to disable non-essential apps from running to save battery juice.
If you are using a mobile network, another reason to disable them is that Apps that aren’t being used will eat up your data plan. You might also find app notifications irritating. You can block them from running in the background, no matter what the reason. Here’s how.
Allow or Disable Windows 11 Apps from Running in the Background
- Right-click on Start and choose Settings.

- Click on Apps, then select Apps & features.

- Next, scroll down and click on the 3 dots beside apps from the right panel.

- After that, select the Advanced option.

- Now, select Never from the drop-down menu under the Background app permissions.

- In the same way, you can turn off one by one by switching off the app, which you don’t want to run in the background.
How to Enable Hibernate Mode on Windows 11
Hibernate mode turns your computer into a low-power state, which allows it to shut down without losing any of its work. Your apps remain open, and your computer will turn itself on again to resume work. It uses less power than Sleep mode. If you don’t prepare to use your computer for a long time, it is a great choice. However, the Hibernate option is missing from the Power button on Windows 11.
Follow the steps to enable Hibernate on Windows 11 :
- Type Control panel on the Search menu and hit Enter key.

- Then, go to System and Security.

- Choose Power Options.

- Click on Choose what the power button does from the left panel.

- After that, select Change settings that are currently unavailable to make Hibernate available.

- Checkmark on Hibernate box and click on Save Changes.

- Next time Hibernate option will be available in the Power button.
How to Set Active Hours to Avoid a Windows Update Restart
Windows Update has been the subject of much controversy since its launch. Before Windows 11 gave users greater control over updating. Windows 11 makes updating a requirement to keep your system up-to-date. This is based on sound logic. I’ve seen computers that were not updated often, making them vulnerable to attacks.
There must be balance. Windows Update’s disruptive nature was one of the main complaints when Windows 11 first came out. It was frustrating to come back to your computer to find that an update had restarted it. Windows 11 has since been updated to give you some control over the updates and schedule when installed.
Windows 11 Anniversary Update added Active Hours, which informs Windows 11 about the hours you use your computer. It will not automatically restart your computer during this time to install updates. Windows will not restart your computer during the period you have set.
How to Manage Windows Update with Active Hours
- Press Windows key + I to open Settings.
- Go to Windows Update and click on the Advanced option from the right panel.

- Scroll down, and select Active hours.

- After that, click on the drop-down menu beside Adjust active hours and choose Manually.

- Next, set your Start and End times when you use your PC.

- Note: Active hours should be 18 hours or less.
- Once you set then close the Window.
More from Digital Dopes: