


Before installing Windows 11 on your PC or Laptop, Microsoft recommends doing a PC Health Check ( Windows 11 Compatibility Checker App). You are getting a “This PC Can’t Run Windows 11” error on your screen, you cannot Install Windows 11 Until you see “This PC can run Windows 11” message in PC Health Check App. While Upgrading to Windows 11, many users are getting a “This PC Can’t Run Windows 11” Error. This is due to few factors like TPM Settings or Secure boot settings. This step-by-step guide will show you how to fix ‘This PC Can’t Run Windows 11’ error.

It is very Important to Fix This Pc can’t Run Windows 11 Error in if you are willing to Upgrade to Windows 11 or perform a clean installation of Windows 11.
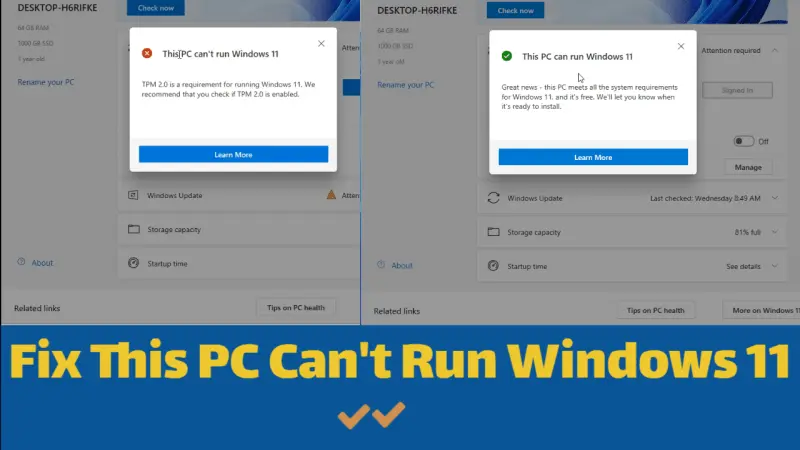
This PC Can’t Run Windows 11 – Why the error is generated?
Windows 11 is compatible with almost all current PCs. Regardless of whether you have a compatible device, the Health Check app may display the “This PC Can’t Run Windows 11” warning.
Incompatibility Issue in Windows 11: Possible Causes:
- The Health Check tool produced an incorrect report.
- Your computer’s TPM is turned off.
- Secure Boot isn’t turned on.
- Steps to Resolve If Your PC Is Unable to Run Windows 11
- Health Check App’s Report Is Incorrect
Update From Microsoft – System Requirements
Microsoft has corrected the instructions surrounding the TPM requirements for Windows 11 in the compatibility paper. TPM 1.2 was formerly the minimal need, and now TPM 2.0 is required to operate Windows 11. In addition, the Health Check app displays the precise cause of incompatibility.
To begin, Microsoft’s official compatibility document divides the new operating System’s hardware requirements into two categories: “Soft Floor” and “Hard Floor.” TPM 2.0 is mentioned first; however, TPM 1.2 or newer can also be used with Windows 11.
The Health Check software compares your machine’s compatibility to the second-floor technical specifications, including TPM 2.0 and 8th Gen Intel and Ryzen 2000 series CPUs.
However, you may install Windows 11 on any contemporary 64-bit dual-core CPU with a 1GHz clock speed with TPM 1.2 security. Consequently, the warning “Your PC can’t run Windows 11” might be due to an incorrect analysis by the Health Check program. Microsoft has already recognized the problem and will update its Health Check app with more information on hardware requirements in the coming weeks. Microsoft stated, “We’re going to update the PC Health Check app over a coming couple of weeks. “So, keep an eye out for a new version of the Health Check tool. It’s available for download by going to the Windows 11 website and clicking the “Check for Compatibility” box. We’ll post a direct download link here once the update is available.
What is TPM
The Trusted Platform Module, or TPM, is a security chip that performs security-related tasks using hardware. To begin with, TPM has been a necessity since 2016. Thus it’s likely that your System already contains it.
In reality, TPM 2.0 is standard on all PCs released in the previous few years. As a result, it’s possible that your machine supports TPM but that it’s turned off, causing the Health Check program to claim that Windows 11 won’t operate on it.
If TPM is deactivated, you must manually enable it in the BIOS menu.
Check if TPM is Enabled
There are two methods to check if the TPM is enabled and working properly, they are:
- Through TPM Management Window.
- Through Windows PowerShell
How to Check if TPM is Enabled
TPM Management Window
- Press Win+R to open Run Dialog box in Windows 11, type tpm.msc, and then press Enter.

- Check the “Status” and your “TPM Specification Version” after opening the TPM Management window.


Windows PowerShell
- Search for Windows PowerShell under the Start menu and Run as Administrator by right-clicking on “Windows PowerShell” or by click on Run as Administrator in the Right side of the menu as shown in the picture.

- Type and enter get-tpm once the Windows PowerShell is opened.

- Check to see if TPM is installed and activated.

If the TPM is not enabled then you need to enable TPM from BIOS settings.
Enable TPM in BIOS Menu
TPM can be activated in the BIOS menu if it is not already enabled, follow the steps below to Activate TPM in the BIOS Menu:
- Restart off the computer.
- Open BIOS by pressing required key to open BIOS. Commonly it is F1, F2, F10, F11,Esc and DEL to access the BIOS ,It depends upon your Motherboard which key will open the BIOS,
- The key varies depending on the manufacturer; see the user manual or the manufacturer’s website for specific information.
- When the BIOS menu appears, navigate to Security Tab.

- Look for TPM Device and see whether it’s Enabled or turned on and Enable it if it isn’t already.


- Make sure you Save and Exit now and after that, restart your computer.


Note:
The TPM option is available in different areas of BISO depending on the manufacturer of the Motherboard.
On specific devices, the option may be found under Advanced Settings > Security > Trusted Computing or Settings > Miscellaneous > Trusted Computing.
Turn On Secure Boot
Secure Boot is a security standard that ensures a device boots only with software that the manufacturer approves. This protects against malware and is often found on all current PCs.
To run Windows 11, your computer must support Secure Boot.
Check if Secure Boot is enabled
To see if Secure Boot is enabled on your machine, do the following:
- To launch the Run window, press Windows key + R.
- Type Msinfo32 is the Run to type and enter.

- When the System Information window opens, look for “Secure Boot State.”
- Check to see if it’s switched on. If it isn’t already activated, follow the next steps below to enable Secure Boot State.


Secure Boot should be enabled in the BIOS menu, Just like we did in TPM.
How to turn on Secure Boot from the BIOS
Follow the instructions for TPM to access the BIOS or UEFI menu:
- Navigate to the Boot option from the drop-down menu. You can find Boot Option inside System Configuration or Advanced tab.

- Secure Boot is an option to look for. Verify to check if it’s Enabled if not Enable it.

- Now, Save and Exit from BIOS, restart your computer.


Your Computer or Laptop must fulfill the minimum system requirements for successful installation of Windows 11, and they are:
- CPU:1 gigahertz(GHz) or faster using two or more cores on a compatible 64-bit processor or System on a Chip.
- RAM: 4GB
- Storage: 64GB or larger
- System firmware, Secure Boot capable (Enable on BIOS – check above).
- TPM: Trusted Platform Module (TPM) version 2.0 (Enable on BIOS – check above).
- Graphics card compatible With DirectX 12 Or Later with WDDM 2.0 Driver
- Display: High definition (720p), display bigger than 9 inches diagonally, with 8 bits per channel
- Internet: Windows 11 home edition requires internet connectivity. To complete the device setup, you will need a Microsoft account.
Finally, run the PC Health Check program and verify whether it passes the compatibility test. If this isn’t the case, double-check your computer’s specs.
However, once the Windows 11 builds are out, you should be able to skip the prerequisites unofficially, and certain functions may not operate correctly if your PC or Laptop is too old.


