







Gaming is all about refresh rate. Monitors with high refresh rates allow for smoother gaming and higher FPS. High refresh rates are slowly becoming the norm. As our eyes become more accustomed to higher refresh rates, 60Hz doesn’t feel like 60Hz.
If you feel your Windows 11 installation is slow or unresponsive, you might need to adjust your refresh rate. Here are some ways to change the Monitor refresh rate in Windows 11.

You will require a monitor that can adjust high refresh rates and allow you to choose between them. Your setup may allow you to control your refresh rate using an onboard chip or a software utility.
For your setup to adjust your refresh rate, you will need Windows 11 on your system. These are things you require to get started.
- A monitor by the adjustable frame rate
- A Windows OS installed (Windows 10 or Windows 11) on the Computer.
- Latest GPU and iGPU drivers.
- Updated drivers for your monitor
- The third-party companion app (if your unit bundle with one)
How to Change Your Monitor Refresh Rate in Windows 11
There are a few ways to change the refresh rate of your display. We recommend you use your OEM app or a companion to prevent changes from being reversed when you restart your computer.
However, you can still use the Settings app within Windows 11. It is best for OEM monitors and external monitors. However, the Windows Settings change will not be able to respect your power plan settings. It will return to default values if plugged in or unplugged. This is why it is not recommended to change refresh rates on laptops.
To change the refresh rate of your laptops or Computer monitor, we recommend that you use your companion app. Choose the guide that best suits you.
Change Refresh Rate using Advanced Display Settings
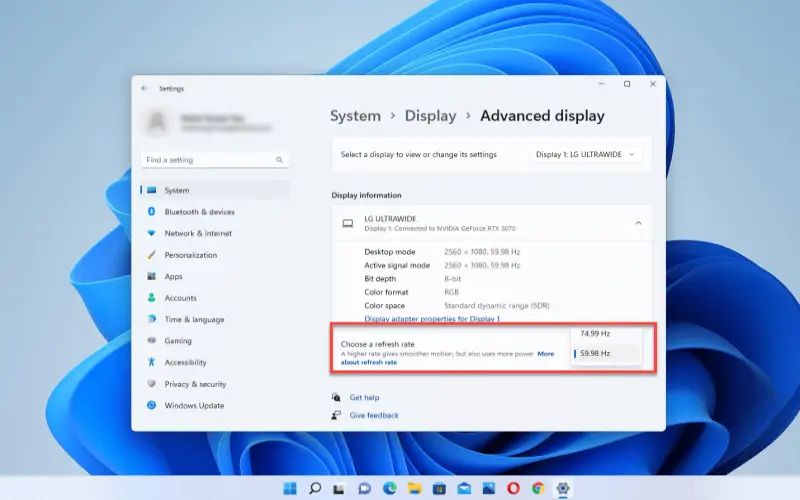
Windows 11 now has a new settings app. It allows you to toggle your refresh rate. You can still access the older advanced display settings. Depending on your preference, follow one of the guides below.
- Press Windows key + I and select Display.


- Scroll down and choose Advanced display.


- Click on the Choose a refresh rate drop-down menu and select your refresh rate.


- To save your change, click on Keep changes.


Change Refresh Rate from Display Adapter Properties
- Press Windows key + I and choose Display.
- Scroll down and go to Advanced display.
- After that, click on Display adapter properties for Display 1 link.


- Move to the Monitor tab and click on the drop-down menu under the Screen refresh rate option.


- Choose your desired frame rate and hit the OK button.

How to Change Your Monitor Refresh Rate using Graphics or OEM App
You can manage your GPUs companion app and the dedicated utility from your OEM to change your refresh rate on Windows 11.
It is the most reliable way to go for pre-built systems and laptops specifically made to work with your system.
Depending on which app you are using, the guide below will help you.
How to Change Your Monitor Refresh Rate using Nvidia Control Panel
- Right-click on your desktop screen and choose Nvidia Control Panel or type Nvidia on the Search menu and press Enter key.


- Under Display option, select Change resolution.


- Note: If you have more than 1 display, then choose the desired display.
- After that, click on the drop-down menu under Refresh rate and pick your desired Refresh Rate.


- Hit Apply button.
How to Change Your Monitor Refresh Rate using AMD Radeon Settings
- Right-click on the desktop screen and choose AMD Radeon Software or Settings.

- After that, click on Gaming tab, navigate to Global Display settings and on the Display.

- At the tip, you will see a list for “Refresh Rate,” If it is not there, click on Create New under Custom Resolutions, and there you will see an option to change the refresh rate. Click on Create button to Create a Custom resolution and apply it.


How to Change Your Monitor Refresh Rate using Intel Graphics Command Center
Intel recently changed from the Graphics Control Panel to its Graphics Command Center. The new command center features a new user interface, better color correction options, multi-monitor management, and many other new features. This utility can be applied to change the refresh rate of your monitor, provided you have a compatible iGPU/dGPU. Follow the methods to get started.
Intel Graphics Command Center Download for Windows 11: Microsoft Store Download Link Intel Graphics Command Center (Windows OS only)
- Open the Graphics Command Center and choose Display from the left panel.


- Click on the Refresh Rate drop-down menu and choose your preferred refresh rate.


- To save your changes, click on Keep.


How to change the Power Plan to get Maximum Refresh Rate in Windows 11 Laptop
This problem is most common for laptop users. Before changing the refresh rate, you should always put the power plan to the max to get the maximum refresh rate from the laptop.
You can also use the AMD Radeon Setting guide if you have an AMD CPU. You can also change your power plan settings and refresh rate using the companion app. Intel users will need to modify their power plan in the app. The guide below will help you get started.
- Open the Graphics Command Center on your PC and select System from the left panel.


- Move to the Power tab.
- Click on the Power Plans drop-down menu and choose Maximum Performance.