


Suppose your Computer does not meet the minimum Windows 11 Requirements. In that case, you can still install the Operating System by bypassing Windows 11 requirements during installation.
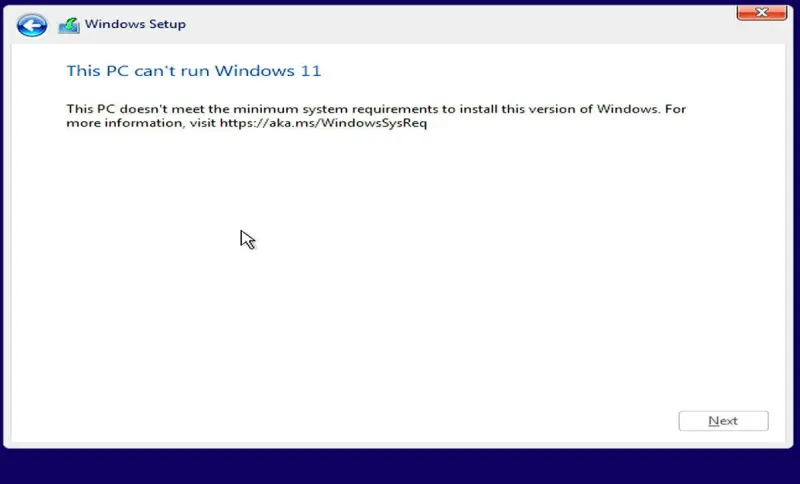
You cannot upgrade or install Windows 11 from Windows Update if the Computer has unsupported hardware. To perform a successful Windows 11 installation, you will need to use a Windows 11 Bootable USB flash drive.
Windows 11 has been released at lightning speed. Many changes have been made to Windows 11, which will cause compatibility issues that you did not experience in Windows 10.
Windows 11 Installation Requirements
It is essential to know that the minimum requirements for installing the new operating system version differ from the recommended specifications. This is what you must know:
- Intel, AMD, and Qualcomm dual-core 64-bit processors running at 1GHz or faster
- Minimum 4GB RAM
- Storage of at least 64GB
- UEFI Secure Boot Supported and Enabled
- A Trusted Platform Module (TPM), version 2.0
- Display with high definition (720p), 9-inch or larger monitor, 8 bits per channel
- DirectX 12 and later are supported by WDDM 2.0 drivers
Which Requirements can be bypassed during Windows 11 Installation
Not all requirements can be bypassed, such as you cannot bypass minimum storage requirements, minimum CPU requirement, minimum Display with high definition requirement, for that you actually need a 720p Display with minimum 9-inch or larger monitor size, 8 bits per channel.
I hope you got the point? Now let’s discuss the requirements which can be bypassed during installation.
- TPM 2.0 Requirement.
- Secure Boot Requirement.
- Minimum RAM Requirement.
Now let’s discuss how to bypass these requirements during Win 11 installation.
Bypass Windows 11 Minimum Requirements During Installation: Step-by-Step Guide
Follow the steps below to bypass Windows 11 minimum requirements during installation:
- Plug the Windows 11 Bootable USB into an unsupported Computer. If you do not have a Bootable USB, create one using our step-by-step guide to create Windows 11 Bootable USB Flash Drive.
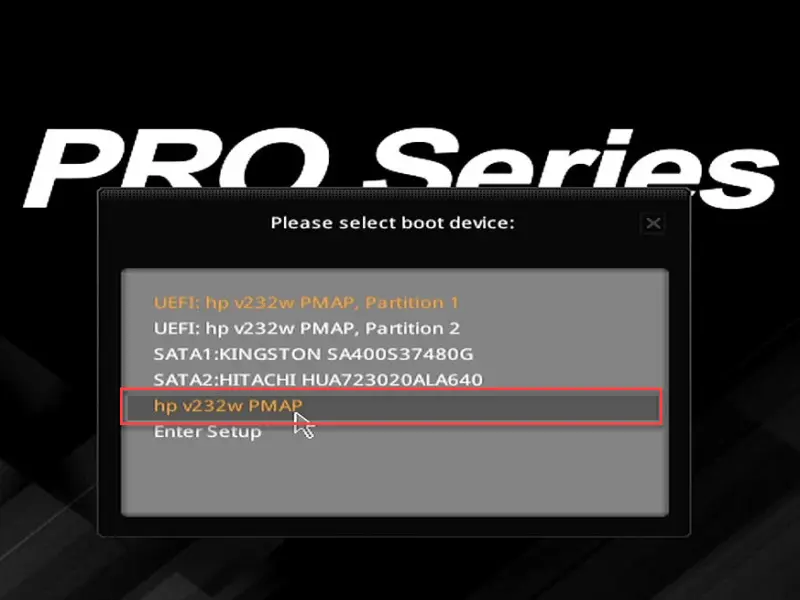
- Power on the Computer with the Bootable Windows 11 USB drive plugged in.
- Select USB Device as 1st Boot Device in BIOS or Open Boot Menu and select USB Device to boot from it.
- Enter Language Details, Other Preferences, and click “Next” to Continue.

- Press Shift + F10 keyboard to open Command Prompt.

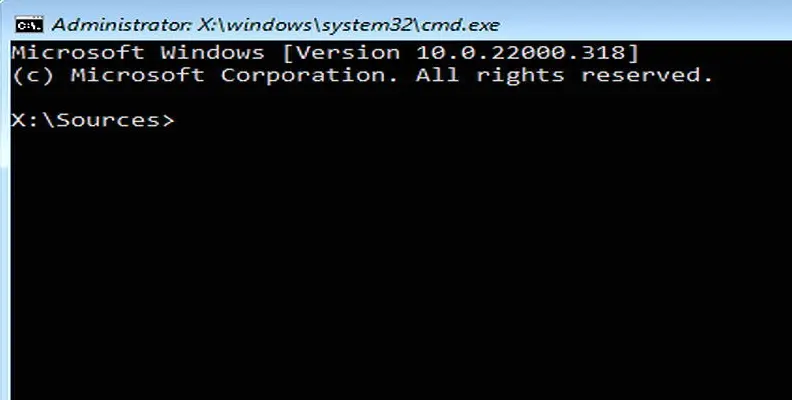
- Type “regedit” and hit enter to open Registry Editor.

- Navigate to “HKEY_LOCAL_MACHINE\SYSTEM\Setup” and right-click on the Setup folder, navigate to New, and select the Key option.

- Type “LabConfig” to name the key.

- Inside the LabConfig Folder, right-click on the white space and navigate to New and then click on the DWORD (32-bit) Value option, repeat the process and create a total of 3 DWORDs files and rename them by BypassSecureBootCheck, BypassTPMCheck, and BypassRAMCheck.


- Double-click on the first DWORD, enter the Value data to 1, and hit Enter key. Repeat the steps for each DWORD.


- After making the changes, close the Registry Editor and the Command Prompt.

- Click on Install Now, and the installation process should continue without any issues.

Install Windows 11 on Unsupported Computer
Now that you have successfully bypassed Windows 11 RAM, Secure Boot, and TPM requirements, follow the steps to Install Windows 11 on an Unsupported Computer.
We are going to describe the installation process in brief. However, you can follow our Complete Guide to Install Windows 11 from USB with no steps skipped.
- If you have a Product key, insert it; otherwise, click on “I don’t have a product key” to skip this step.

- Select the Windows 11 version to Install.

- Accept the license agreement.

- Choose the Type of Installation: Upgrade or select Custom for a clean Windows 11 install.

- Select where you want to install Windows. You can also format the drive if you want a clean windows 11 install (Note: Formatting drive will erase the files from that drive) and click Next to start the Installation Process.

- Windows will start installing the OS and after that, your PC might restart.


- Select HDD or SSD drive as 1st Boot Device in BIOS settings if System did not automatically boot from it.
- Now setup will ask you for specific details like your Country or region, Keyboard layout or input method, wifi password to connect to a network (Note: You can skip connecting to a network option otherwise it will ask you to login with your Microsoft account) , it will also check for updates and the Computer might restart one last time again.


- After the restart, it will ask you to assign a Device name, Username & Password.


- Now it will ask you three security questions.

- After you fill in all the above details, it will ask you to choose privacy settings for your Windows 11 Computer, choose accordingly, and click next.

- It Might take a few minutes and after a few minutes, you can see the Windows 11 Desktop.


Congratulations, you have successfully installed Windows 11 on a Computer with Unsupported Hardware.
More from Digital Dopes:


